Options:
- start program in HRPT record-mode. First incoming signal will be recorded; at the end record stops and programma is aborted. Channels 2, 4, 5 and H will be recorded. (This may be any combination of channels.)
- Same, but chrpt. Channels 2, 7, 9 and H will be recorded. (Note that with CHRPT only pairs of channels can be choosen for record; so specifying channel 2 means that also channel 1 will be recorded; specifying channel 9 means that also channel 10 will be recorded, etc.)
- Same, for Seastar. (No channel selection possible.)
- Same, for PDUS. (No channel selection possible.)
- Gives overview of all readable HRPT files in current dir. A filter may be specified (e.g. *.dat). If a filename is specified (e.g. "hrpt -f hrpt1.dat") then a more detailled overview is given for this file.
- Show all specified recordtimes.(See also Record modes.)
- Change "preferences" file. (See also Edit->Preferences.)
- help
- print version
- -rec 245h
- -rec_c 279h
- -rec_s
- -rec_p
- -f [filter]
- -t
- -i
- -h
- -v
Mouse keys:
| Key | Action | Comment |
|---|---|---|
| left | select | |
| right | abort | |
| middle | activate | If submenu is active; alternative: Press return |
| middle | Coordinates | If submenu is NOT active; alternative: Press: TAB |
This is the main menu:

Menu: File.
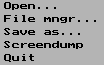
Open.
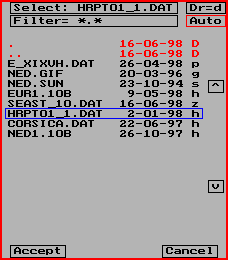 Open a file. Pre-selection by means of wild cards is possible.
- Type after Select filename, directory and/or drive, e.g.:
- E:
- Content of drive E: is shown.
- WEDER\
- Content of directory WEDER is shown.
- hrpt1.dat
- This file will be opened.
- Or:
- Click on the desired filename or (in red) directory
- Scrol by clicking on the arrows right.
- Pre-selection is possible:
- Click on 'Auto' -> only files with recognized format will be shown.
The letter behind each name shows the file type:
- h = hrpt
- z = Seawifs
- p = pdus
- g = GIF
- s = SUN
- Enter a filter, e.g.:
- Filter: hrpt*.dat
shows all files starting with 'hrpt' and extension '.dat'. - h = hrpt
- Click on 'Auto' -> only files with recognized format will be shown.
The letter behind each name shows the file type:
- Click on 'Accept', or click with middle mousekey, to show the selected file. The first recorded channel will be shown.
- Choose in the main menu the desired channel. The numbers of not-recorded channels are shown in grey (not selectable).
- Or:
File mngr
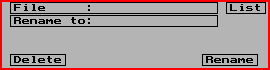 To do a few simple file-manipulations:
- Delete:
- Type filename, or click on 'list' and select file.
- Click on 'delete'.
- Rename:
- Type filename, or click on 'list' and select file.
- Type new filenaam in after 'Rename to:.
- Click on 'Rename'.
Save as...
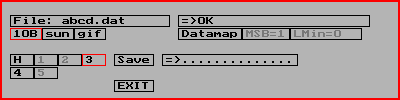 Pictures can be translated in severable formats, complete or zoomed.
If button "Datamap" is activated the luminance as defined at Grmap->Data-map will be taken into account. The picture will look like the picture on screen. If Datamap is not activated the brightness and contrast of the translated
picture will not be the same as the original, but after manipulation it should
be possible to get the same picture.
The part of the picture shown on the screen will be saved, but
the resolution of the screen doesn't influence the copy (this is not a
screendump!
Pictures can be translated in severable formats, complete or zoomed.
If button "Datamap" is activated the luminance as defined at Grmap->Data-map will be taken into account. The picture will look like the picture on screen. If Datamap is not activated the brightness and contrast of the translated
picture will not be the same as the original, but after manipulation it should
be possible to get the same picture.
The part of the picture shown on the screen will be saved, but
the resolution of the screen doesn't influence the copy (this is not a
screendump!
Supported formats are:- 10B:
-
The special HRPT/SeaWifs-format. No information will be lost; all 10 bits of the data, satellite direction, Kepler-data etc. will be saved, and any one to 5 (8 for Seawiffs) channels may be saved in 1 file.
- PDUS
-
The special PDUS-format. Currently translation is only possible from PDUS to GIF or SUN.
- GIF
- The well-known Graphics Interchange Format. These files can be read by other programs. But just 1 channel can be saved, and 8 out of 10 databits. All extra information like Kepler-data will be lost.
- SUN
- A relative unknown but very simpel format of Sun. Uncompressed, so larger files than GIF. Also 8 bits per pixel, 1 channel.
Settings are default:- Translate to the same format
- Save only the channel selected in the main menu
- Translate from 10 bits to 8 bits in such a way that the grey tints as shown on the screen will be translated in the most optimum way.
How to use:
- Enter filename.
- Select the desired format.
- Select channel. If you translate to 10B-format you can select several channels. Best is to select also always the frame-header (H) (containing all transmitted non-picture data); the filesize will increase max. ca. 45% (1 channel saved) and minimum 8.5% (5 channels saved).
Translating from 10B to GIF or SUN-format means that you have to choose which 8 of the 10 databits will be saved. (Note: In the documentation of the HRPT format bits are numbered 1 to 10; bit 1 is MSB and bit 10 LSB. This definition is also used here.)
The following 2 figures determine the translation:- MSB: 1, 2 or 3
- Lmin: Minimal luminance, >= 0
E.g.: MSB=2, Lmin=64 means the range 511 ... 64 (448 values) will be mapped to 255 ... 0.
All values smaller than 64 will be translated to 0.
All values larger than 512 will be translated to 255.
Following table shows some examples:MSB Lmin Used range original "resolution" 1 0 0 ... 1023 4 -> 1 1 768 768 ... 1023 1 -> 1 2 0 0 ... 512 2 -> 1 2 256 256 ... 512 1 -> 1 3 0 0 ... 256 1 -> 1
As said the 2 numbers are calculated from the result on the screen (see: Grmap). If needed you can change them before saving. Hint: To save as much info as possible, try to get the range width to 256, so:
- MSB=1 / Lmin=768 or
- MSB=2 / Lmin=256 or
- MSB=3 / Lmin=0
Screendump
 To get a real screendump in GIF, SUN or TIF format. Everything on the screen, except the main menu, is saved, so also drawn longitudes/lattitudes.
GIF and SUN are 8 bits formats; TIF is 24-bits per pixel format (true color).
The result is saved in file scrndmp#.gif, scrndmp#.sun or scrndmp#.tif resp. Existing files are not overwritten; '#' is a number which is choosen such that the file to generate doesn't exist.
Note that the resolutiuon now depends on the graphical resolution!
Quit
Exit the program.
Menu: Edit.

Save/Load header info.
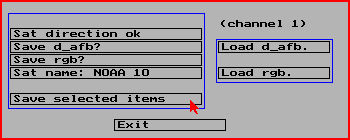 To read/write certain header-information.
- 10B-format:
- Satellite direction may be changed. First select the right direction in the main menu (so the picture is not upside-down) (plotmode). Now click on: 'Sat direction N->S'. (If selected direction is already saved then the button shows 'Sat direction ok', and is inactive.)
- Save d_afb: Data-mapping (as defined with Grmap -> Data-map) may be saved and reloaded, separately for each channel.
- Save rgb: RGB settings as selected in Plotmode->Algorithm" may be saved and reloaded.
- Sat name: Change satellite name.
- GIF and SUN:
- Save or reload palette.
Change Kepler time.
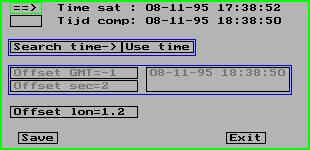 To calculate the longitude/latitude the record starttime is needed. Following times can be used:
- The satellitetime, present in the transmitted HRPT-data (only if the frame-header is also recorded)
- The computertime, if the frame-header not is recorded.
Choose the desired source by clicking in the rectangle left of Time sat : or Time comp:.
- Satellite time:
- For each new record the time has to be extracted 1 time.
Choose: 'Search time->'
If the shown time looks unreliable (data error), click again to search again, lateron in the file. The extracted time will be translated to the actual starting time.
-
At: 'Offset lon=' a longitude-correction can be entered. This shifts the raster in east<->west direction.
- Computertime:
- Use only if the satellitetime is not available. For longitude/lattitude calculation UTC time is needed; if computertime is on MET Offset GMT= should be:
- -1 (wintertime) of
- -2 (day-light saving time).
A small correction can be entered at: Offset sec= (maximum: +127/-128 secondes = +2 min 7 sec/- 2 min 8 sec.)
A larger correction can be established in the rectangle containing the total time; here, the saved computertime can be changed directly. Write down the original time before changing, so you can restore it if needed!
How to change this time:
- Click in the rectangle, now an arrow is shown up under the time.
- Move the arrow till it is under the number to be altered, by means of the cursor keys '</>'.
- Increment/decrement the number by means of the cursokeys '^/v'.
Choose: "Save" to save extracted time, corrections and the choice 'computertime' versus 'satellitetime' into the HRPT-file.
Note: Results of changes can be shown, before doing the actual 'Save', by redrawing the picture (Plot).
Change Kepler data.
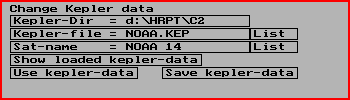 To calculate longitudes/latitudes Kepler-data is needed. The program can read directly the wel-known 'NASA 2-line' format.
- Choose the Kepler-file:
- Change if necessary the directory at: Kepler-dir
- Type filename in at: Kepler-file
- Or: click on List and select the file with the mouse.
- Choose satellite:
- Type satellietname at: Sat-name.
- Or: Click on List and select the satellite.
- Read the Kepler-data:
- Click on Use kepler-data to test the new data without saving.
- Click on Save kepler-data to save the new data into the (C)HRPT-file.
Note:
- The transmitted data contains a code showing which NOAA was recorded. If the frame-header (H) was also recorded, and if the code is recognized by the program, the right NOAA name is already filled in at "Sat-name". But:
- The satellitename must exactly match the name in the Kepler-file, including spaces and case.
- Use at List the filter to reduce the amount of shown satellites, e.g..: NOAA* to show only the satellites with names starting with NOAA.
NOAA->SeaWifs.
If a Seastar satellite is recorded in NOAA-format or vice versa you can correct this afterwards. The effect of a wrong recorded file is vertical bars in the picture.This change will be saved at
Preferences.
All kinds of settings can be saved in a preference file, like graphical mode. The name of this file is hrptpref.ini.How to use: Select left a item, change right.
- Graphics
- Svga driver
- name of the SVGA-driver, eg. svga256.bgiOnly important in SVGA mode.
- Path to Svga driver
- E.g. C:\inithrpt\. Only important in SVGA mode.
- Resolution
- hor/vert pixels, e.g. 640x480, 800x600 etc. Modes until 1600x1200 are pre-programmed. See also chapter Settings.
- Color bits
- Depends also on graphical mode.
- Graphics mode
- VGA, SVGA or VESA. For SVGA a driver is needed.
- Svga driver
- Mouse
- svga cursor on/off
- Most graphics cards will not support a cursor in SVGA-mode. Choose: svga cursor on to let the program generate a cursor. If the cursor leaves stripes while moving then choose 'svga cursor off'; the cursor is already drawn. (Some cards could give problems: strikes, but no cursor if you select 'svga cursor off'.)
- Interface
- port_type =
- always: parallel.
- decoder port_nr =
- Choose the port number: 1, 2 or 3.
- output port_nr =
- This is for future use.
- Record (Note: These settings can also be altered in the Recordwindow. See Record.
- Plot during record: Nn/Off
- Plot line interval: #
- Auto record: On/Off
- Start rec after insync: #
- Stop rec after outsync: #
- Stop after # lines
- Time out after # minutes: #
- Time-out in minutes, after this time "wait for in-sync" is aborted.
- File record times
- File met opnametijden
- Sat dir South -> North/Sat dir North -> South
- Digits in auto_file
- To specify how many digits the automatic generated filename contains. (1, 2 or 3) (E.g. "2" gives pdus02.dat)
- Sattype
- Default satellite type at start-up.
- Load kepler after record/Don't load kepler
- If specified then after record Kepler data will be automatic loaded from this file.
- Plot during record: Nn/Off
- Plot
- Correction X-mapping On/Off
- Sat direction during record: South -> North/Sat dir North -> South
- Grid color:
- Color of landcontours for Meteosat-pictures. Click until desired color is shown. Colors: red/green/blue/cyaan/white
- Raster color:
- Color lon/lat-lines for HRPT-picture. See "Grid color".
- Correction X-mapping On/Off
- File mngr
- Work directory
- Filter
- Kepler file
- Filter
- Save
- Cancel
- svga cursor on/off
Menu: Grmap.
Functions to change mapping of the data to the screen.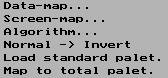
Luminance: Data-map...
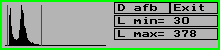 A histogram shows the luminance of the picture.
The 2 red vertical lines show the 'black' and 'white' positions.
All data values left of the left line are mapped to 'black',
all values right of the right line are mapped to 'white'. All data-values between the 2 lines are mapped to grey-tintes.
For best results: Move the 2 lines such that the non-0 values of the histogram are between them:
A histogram shows the luminance of the picture.
The 2 red vertical lines show the 'black' and 'white' positions.
All data values left of the left line are mapped to 'black',
all values right of the right line are mapped to 'white'. All data-values between the 2 lines are mapped to grey-tintes.
For best results: Move the 2 lines such that the non-0 values of the histogram are between them:
- Click on 'D Afb'.
- Move mouse near red line to be moved.
- Press left mouse button and move line to desired position. Then release mouse button.
- Do the same for the other line.
- If ready -> Click with right mouse button.
- You can also change the numbers directly, at Lmin and Lmax. The range is 0 ... 1023 for 10B files and 0 ... 255 for PDUS, GIF and SUN-files.
Screen-map... (palet)

With the 4 graphics now visible you can change the palet (luminance, red, green, blue); in this way you can color the picture. Each line has 5 dots (nearly invissible) which you can move with the mouse in vertical direction. The result is visible immediately. Each graphic has its reset-key. After clicking on X fixed (--> X not fixed) also the horizontal position of each dot can be changed.
- save: Settings are saved in a separate file.
- load: Saved settings are reloaded.
Note If the picture is saved as Gif or Sun (see menu Save) the color palette is also saved. If lateron the file is loaded then to get the colors back the palette has to be reloaded using menu Edit -> Save/Load headerinfo....
Linear combination of several channels: Algorithm...

Note Doesn't work in combination with despickle and middle!
Note: To get acceptable results you need VESA mode, minimum 16 bits! Click on: 'algo off' (changes to: "algo on"). Now you can select more than 1 channel (in the mainmenu). For each selected channel 3 numbers can be specified, to define the contribution to red, green and blue. Also, an offset for each color is possible: ro, go and bo.
Example: Suppose that channels 2, 4, 6 and 7 are selected, and the following numbers are entered:Offset Chan 2 Chan 4 Chan 6 Chan 7 ro=-10 R=0.00 R=0.00 R=10.00 R=1.00 go=-20 R=0.00 R=10.00 R=0.00 R=0.00 bo=-30 R=10.00 R=0.00 R=0.00 R=0.00 The contribution of each channel to red/green/blue is for each pixel:
red   = ro + R2xK2 + R4xK4 + R6xK6 + R7xK7 = -10 + 10xK6 + 1*K7
green = go + G2*K2 + G4xK4 + G6xK6 + G7xK7 = -20 + 10xK4
blue  = bo + B2*K2 + B4xK4 + B6xK6 + B7xK7 = -30 + 10xK2
Here, Rx/Gx/Bx are the entered values of channel x, and Kx is the value ('luminance') of channel x for the point.With Seawifs channel 2 is blue, channel 5 green and channel 6 red (approximated). A guideline:
Offset K2 K5 K6 red -30 0.00 0.00 0.30 green -30 0.00 0.30 0.00 blue -30 0.30 0.00 0.00
These values may be loaded directly by clicking button RGB.Also for CHRPT some values are pre-programmed:
(These values are not really optimal yet.)Offset K1 K2 K7 K9 red 0 -1.00 1.00 0.00 0.00 green 0 0.00 0.00 -1.80 4.50 blue 0 0.00 0.00 1.40 -2.00 For HRPT no values are pre-programmed; the button is deactivated.
Not-selected channels don't give a contribution, so there is no need to change values of these channels to '0'.(Calibration-data send by Seawifs is currently not used.)
Some spectral numbers of Seawifs:
channel wavelength [nm] 1 402-422 2 433-453 blue=435 3 480-500 4 500-520 5 545-565 green=546 6 660-680 red=700 7 745-785 8 845-885
Inverting the luminance: Normal -> Invert
To invert the picture (e.g. for IR channels).
Load standard palet
By default the program uses a grey-palet. If you did change the palet you can reset it to its original state.
247 entries of the palet are used for the picture itself; 8 colors are reserved for the program (colors for cursor, menus, window boundaries ec.)
Map to total palet.
To show correctly a GIF/SUN-picture, generated by another program, all palet entries are needed for the picture. Note that cursor color etc. will change, and will bmaybe become invissible!
Zoomen.
Menu: Zoom.
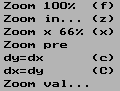
Zoom in... (z)
- Choose: 'Zoom -> Zoom in' or type 'z' to zoom in..
- Click on lower left corner, and then of upper right corner of the part.
- Cancelling is possible by means of the right mouse button.
Zoom out
- Choose: 'Zoom -> Zoom 100%' or type 'f' to get the full picture.
- Choose: 'Zoom -> Zoom x 66%' or type 'x' to zoom out 66%.
Zoom pre.
Toggle between current zoom factors and previous one.
dy=dx (c)
To make zoom-factor vertical equal to horizontal. In combination with Plotmode -> Linearise this will result in a more or less natural picture.
dx=dy (C)
To make zoom-factor horizontal equal to vertical.
Note: This can result in a black bar right of the picture.
Zoom val...
Add zoom-factors yourself.
- Choose: 'Zoom -> Zoom val...'
- Fill in:
- zoom-factors (zx, zy)
- shift (ox,oy)
- mapping to screen (dx,dy) (instead of zx, zy) (dx=dy=1 means: 1 pixel on the screen is exactly 1 pixel of the picture.)
- Click on 'Plot' to see the result.
- Use Page up / Page down to make the window invissible/vissible.
- Click on Ex to close the window.
Menu: Record.


- Choose C, HRPT, PDUS or SeaWifs (C=CHrpt)
- For (C)HRPT: Choose channels to record, or 'All chan' (all channels).
Note: To "encourage" recording the frame-header info (H), each time you select a channel, H will be added too. If you don't want to record the frame header, click on H after selecting all channels.
NOTE:- CHRPT => Only pairs of channels can be recorded: 1/2 and/or 3/4 and/or 5/6 and/or 7/8 and/or 9/10.
- For PDUS: No channelselection needed and possible.
- For Seawifs: No channelselection needed and possible.
- Click on 'Start'.
Recording is started now; achter 'Rec status' shows: 'Recording...'. With PDUS also the satellite name and format type are mentioned.
Results are saved in a new (previously not existing) file. - Hit an arbitrary key to stop recording.
- Click on 'Exit' to leave Record mode. The recorded picture will be shown now.
Record modes.
There are 4 ways to record:- Direct (Now).
Record starts immediately after clicking Start. Hit an arbitrary key to stop recording. - One picture (Next).
After Start the program waits until the first non-encrypted picture; this will be recorded.
- All pictures (All).
All non-encrypted pictures are recorded. Hit an arbitrary key to stop this endless loop.
- On certain times (Time).
Record times are specified in a file. This file is read after clicking on Start and the first record time will be catched. Now the program waits until this time; after that, the first non-encrypted picture is recorded. (So, actual recordtime could be (much) later than specified time!) Now the file is read again and the next time is catched. This procedure stops if there are no times in de future anymore.
- One picture (Next).

With the last 3 methods 'waits' may be specified befor start and stop:
- Fill in at: 'Start after:' after how much correct received frames (decoder in-sync) record has to start.
- Fill in at 'Stop after:' after how much incorrect received frames (decoder out-sync) record has to stop.
Example 'Start after: 6' means: Start after 6 frames in a row are received without errors (In-sync) (HRPT: 1 seconde).
'Stop after: 90' means: Rcording stops after 90 frames in a row show errors (Out-sync). (HRPT: 15 seconden).Behind Rec/Encryp is shown how many pictures are recorded and how many are skipped because they were encrypted.
File with record times.
Times in the file may be specified exactly (hour:min:sec day-month-year) or partly (eg. hour:min):
Time Recording starts: 10 10 hour, today 10:10 10 hour 10 min today 10:10:10 10 hour 10 min 10 sec today 10:10:10 10 10 hour 10 min 10 sec 10th day of current month 10:10:10 10-10 10 hour 10 min 10 sec 10th day of october, current year 10:10 10-10-2001 10 hour 10 min 10th day of october, in year 2001 10:10 11:10 starttijd is 10:10 vandaag, stoptijd is 11:10 zelfde dag 10:10 10-10 11:10 starttime is 10:10 at oktober 10, stoptime is 11:10 at oktober 10 10:10 11:10 10-10 starttime is 10:10 today, stoptime is 11:10 oktober 10 10:10 10-10 11:10 11-10 starttime is 10:10 at oktober 10, stoptime is 11:10 at oktober 11
A line starting with # or * will be ignored.
There is no need to order times .
Times with non-specified day repeat each day:- If e.g. 10:10 and 20:20 are specified the record-loop ends after recording first picture after 20:20.
- After clicking on Start at 23:59 nothing happens (all times are in the past).
- After clicking on Start at 00:00 (new day) the record loop starts again, waiting until 10:10 resp. 20:20 to record the first picture after these times.
hrpt -t
the content of the file will be shown. In thsi way you can check if the file is correct. You can make the file with any texteditor (eg. MSDOS Edit).
- Direct show pictures during recording.
- Click on 'N->S' to define the expected satellite direction (north->south or south->north)
- Define how fast the screen will be filled at 'Skip lines'.
E.g..:
- '0' means: each received line will be shown on the screen.
- '3' means: show 1 line of every 3 lines. Etc.
If the resolution of the screen is 640x480 then fill in: 5400/(480-65)=13.
After 1 pass the complete picture will exactly fill the screen.
If the number is '0' then screen is filled after about 1 minute; then the picture will be overwritten with the next part.
Note: Of course, this has no influence on the data saved in the file!
If direct showing is not needed click on: 'Plot during rec'. This will change into: 'Don't plot'
(Note that writing to the screen consumes some computer power; switching off this feature could mean that you are able to record 1 channel more, if you use a slow computer!).
- File names.
- File names are deterimined automatic:
- for HRPT: hrpt1.dat, hrpt2.dat etc.
- for PDUS: pdus1.dat, pdus2.dat etc.
- for Seawif: seaw1.dat, seaw2.dat etc.
- Save directly to right file: click on 'Auto'; dit becomes: 'Manual'.
Fill in after: 'File:' the filename. - Dont't save, only show picture on screen: Click on:
'Save in file'.
Dit turns into:
'Don't save'.
(Make sure that 'Plot during rec' is active, otherwise you will not see any result.)
- File names are deterimined automatic:
Menu: Plotmode.
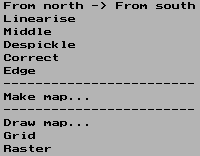
- Satellite direction.
- Choose: Plotmode -> From south->From north
- or : Plotmode -> From north->From south to define the satellite direction (that is, to correct if the picture is upside down).
- linearise X-direction.
- Choose: Plotmode -> linearise
- Smooth: remove rectangle blocks.
- Choose: Plotmode -> Middle
- Despicle.
- Choose: Plotmode -> Despicle
- Correct faulty lines.
- Choose: Plotmode -> Correct
- Detect contours.
- Choose: Plotmode -> Edge
- Saving contours to a file.
Only with 10B-files; Kepler-data have to be available.- Choose: Plotmode -> Make map...
- Change filename if needed.
- Click on Activ.
- Plotmode -> Make map...
- Click again on Activ to deactivate this mode.
- Overlay of contours in a picture.
Only with 10B-files; Kepler-data must be available.- Choose: Plotmode -> Draw map...
- Change filename if needed.
- Click on Activ.
- Adding grid (land countours) (PDUS only).
- Choose: Plotmode -> Grid
- Draw Longitude/lattitude lines.
- Choose: Plotmode -> Raster
Menu: Plot.
Keyboard equivalent: sMenu: 1, 2 ...
Choose a channel to show.Appendix. Format contourfile.
NEW
{lon 1} {lat 1}
{lon 2} {lat 2}
...
NEW
{lon 1} {lat 1}
{lon 2} {lat 2}
...
Lines will be drawn between successive lon/lat pairs. After 'NEW' a new line is In this way you can make the contourfile by hand (this is a lot of work!).
Or you can make corrections in a automatic generated contourfile.
Note: Everything after # of -- is comment.
Example:
#England
-5.5	50
1.5	51.2
1.8	52.7
0.5	53.1
-2.8	56.3
-1.8	57.7
-4	57.7
-3	58.6
-5	58.7
-7	56
-3	53.5
-4.8	53.5
-5.5	50
NEW
# Spain
-5.5	36	-- street of gibraltar
-6.5	37
-9	37
-8.8	38.5
-9.5	38.7
-8.7	41
-9.1	43
-8	43.6
-1.8	43.2	-- pyreneen, west
# France
-1	46
-4.8	48
-4.9	48.6
-3	48.8
-1.5	48.7
-2	49.7
0	49.5	-- le havre
1.2	50
1.5	50.8
2.5	51
# Belgium
3.2	51.2
# the Netherlands
4.1	52
4.7	52.9
5	53.2
6	53.5