Picture-data can be viewed directly, or translated into standard picture formats.
Xrit2pic can perform some simple dataprocessing; e.g. false colour pictures
may be generated by mapping multiple channels onto different colours.
Some dedicated mappings (e.g. fog and dust detection) are built-in. (Currently only working for MSG.)
Xrit2pic can also generate anaglyphs (3D images); the luminance is translated into altitude.
Movie generation is implemented, and is also possible in combination with all mentioned features.
For polar satellites tracks may be plotted on a world map; selection of parts of a track
to view or export is supported.
All data processing is done using directly the received raw files, so without generation
of intermediate files.
Next figure shows the place of xrit2pic in a MSG receiving environment.
For more information see:
http://www.eumetsat.de
Note: This is just an example; data coming from the Eumetsat ftp service, located on a CDROM etc. are equally suitable to manage by xrit2pic.
xrit2pic is available for following platforms:
xrit2pic is also compilable for other platforms (Sun/Solaris, MAC, etc.); source code is available (ask for the newest source code; the code on the web-site is not always up-to-date)
Note that (as far as I know) Eumetsat does only support Linux and Windows platforms, for their
Tellique software.
Xrit2pic doesn't need much PC memory; normally way under 1G. Executing several xrit2pic's in parallel is no problem. Note, however, that xrit2pic can delete (on request, of course) or move files; if a second xrit2pic is using the same data it can get "confused" (but should not crash!).
Some tabs contain a 'Save' button, to store the settings in that tab. Currently this is done for the 'main' tab (under 'More'), 'Record' tab, and 'Received' tab. (This replaces the 'gui state sav' option in previous versions of xrit2pic.)
There are 3 places where xrit2pic.ini are searched after starting xrit2pic:
The 2 most important settings are:
There is one exception: You may use MDM for MSG and xrit2pic for AVHRR together,
if you don't have David's AVHRR Manager. xrit2pic has a special AVHRR mode,
which makes it 'blind' for MSG data; MDM is 'blind' for AVHRR anyway.
So, MDM will not touch AVHRR files; xrit2pic will not touch other than AVHRR files.
This prevents conflicts between the 2 programs.
Description main window:
Selection can be done in several ways:
Expand: Expand the tree 1 level, so all channels become visible. Clicking again will collapse the list.
After selection of one or more items a preview or file generation can be performed.
If the picture needs to be exported with special options, i.e. zoomed,
custom luminance settings etc., use the File->Save menu in the preview window.
Note that if xrit2pic is in continuous update mode (see record)
and in AVHRR mode then MDM should also be activated.
Otherwise the 'received' directory will get a lot of files,
and xrit2pic will need more and more time to analyze this dir,
to see if new files are added.
(This is one of the reasons why both programs try to keep the received directory empty!)
Postprocessing.
Instead of using data in the 'received' directory, left there by Tellique,
xrit2pic can also read jpeg files. In this way xrit2pic can be used as postprocessor
of data handled by MSG Data Manager:
The files show up in the tree window as single segment files, but for the rest
all xrit2pic features can be used:
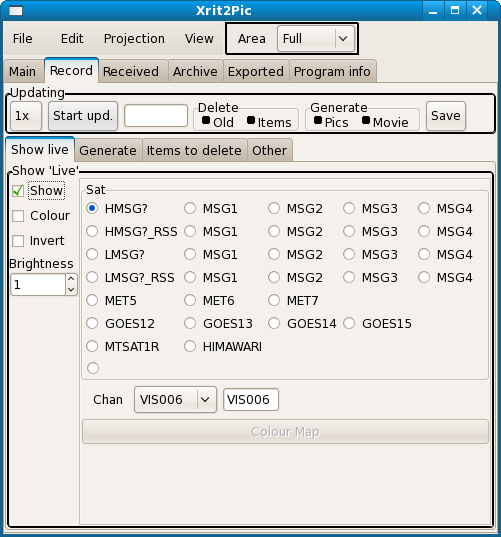
Main window.
The main window contains several tabs for:
Figure 1 gives an impression of the program in-use.
From here, items can be selected to
view and export.

A channel which is 'complete', i.e. all segments are available, is coloured green.
A channel in which one or more segments are missing is coloured red.
For correct displaying of channel HRV the prologue file is needed.
If this file is missing the HRV-line is coloured yellow.
Multiple selections are possible, for sets, channels or segments:
Buttons in main window.
To make selection easier certain items visible in the tree can be hidden, using
the second button under 'List' (now showing 'All');
e.g. just HRIT picture items can be made visible, or just LRIT MET7 items, etc.
This list will only show items present in the tree.
Menu items
Note: Deleting AVHRR files is only possible after selecting a blue line. Single channels can not be deleted because all chanels are in 1 file.
Basic actions in the main tab.
Preview.
Note:
Note: In the top-bar of the window following figures are shown:
If not ticked the luminance of the picture itself is used.
If ticked a dedicated channel (see Preferences) is used. By default this is channel 9 (IR_108).
If not selected the overlay is shown as one solid white line, as in non-anaglyph mode.
Note:
Drawing a picture the first time takes some time because first the data has to be decompressed.
(For a high resolution colour picture 4 pictures have to be decompressed.)
To speed-up redrawing:
Export.
Default format of the exported picture depends on the format in which it was received:
Note: RAH is hrpt 10-bits-per-pixel format. This is readable by:
See Other features for selecting different formats.
Data processing.
Content:
Overlay for MSG: Country boundaries etc.
There are currently 2 ways to add coast and country boundary lines:
A prefered type can be choosen from Preferences, tab 'generation'. The prefered type will be tried first, then the other type.
For both types overlay files have to be downloaded.
"Picture" overlay files.
Download the overlay files:
Overlays
From here you may choose to either download each overlay file separately (choose "singleFiles") or to download zip-files (choose "zipped")
In the zipped folder you can find zip-files for msg, foreign (fsd) or met first generation (mtp), or just download everything in 1 zip file.
Don't change the names of the files. Place them at one of the following locations:
If a 'blue line' is selected then a colourpicture can be generated; click on 'Enable' in the 'Colours' box. By default the following mapping is used:
| red | green | blue | |
|---|---|---|---|
| HRIT | IR016 | VIS008 | VIS006 |
| LRIT | IR016 | -- | VIS006 |
| Himawari | B05 | B04 | VIS |
| AVHRR | Ch1 | Ch2 | Ch4 |
Selecting button 'Mapping' pops up a window in which you can change the mapping:
Contribution of each channel to any colour can be changed with the spin-buttons
below, between (e.g.) +100 and -100%.
For each colour an offset may be defined.
Calculation of the contribution of each channel depends on the 'Mirror neg. values' button.
Some default mappings are built-in:
Also see next chapter 'Special mappings window'; in here, the mappings are set (and can be altered if desired).
The formula's used to create the high resolution colour is, for each pixel:
Ll=(Rl+Gl+Bl)/3
Rh=Lh * Rl / Ll
Gh=Lh * Gl / Ll
Bh=Lh * Bl / Ll
With:
Note that for grey parts (Rl=Gl=Bl) the result is: Rh=Gh=Bh=Lh
Pressing 'Help' gives a overview of the meaning of the status-'led's':

Note on using preview window: The first picture selected will be shown in the preview window. If this pic is not suitable to do the settings then:
Some extra movie features:
In the Translate window, second row of buttons, choose near 'Tempfiles':
If multiple items are selected only the first item will get a preview.
It is however possible to use another item to do the settings:
Generate files from raw data. The satellite choosen in the 'Show Live' tab will be used. However, the colour mode is determined by settings in the 'Main tab! This includes hiresolution and special mappings. The picture type (jpeg etc.) is determined by format (jpeg, pgm etc.).
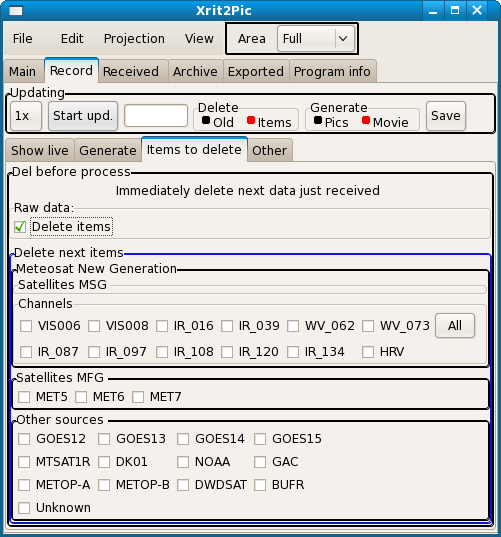
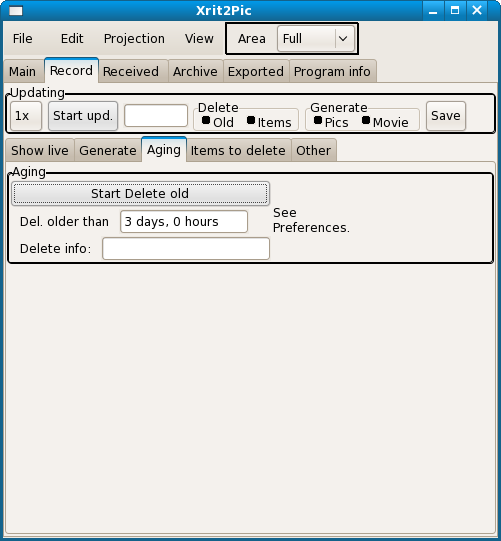
More down you can select that data with a certain age should be deleted (amount of days can be defined in preferences).
E.g.:
rename %s arch/%s
will move the generated file into directory 'arch'.
On top of these sub-tabs there is a common 'Updating' part. updating means that xrit2pic adds new received files to it's internal database. As a result these files show up in the tree (main tab) as they arrive.
xrit2pic uses following directory structure to handle xrit-data:
Move data between received and done directory:
Normally never needed.
Click the Exported tab.
Exported/generated files (including movie files) in the destination directory are now visible. Files may be viewed using an external viewer (see 'Viewer programs' in preferences) or deleted. Temporary files, used to generate movies, are also accessible via this window.
Currently xrit2pic only uses prologue files to extract the position of the
2 parts of the HRV channel. The used prologue data is visible using Preview
(select first the prologue file in the tree).
If data is processed using external programs the prologue/epilogue data may be
needed. For this purpose they can be exported.
To extract a prologue/epilogue file select the item and click on 'Export'.
It is possible to export prologue/epilogue files in an automatic way together with the channels they belong to. See 'Other features'.
By default files will be generated with highest possible quality:
| default | PGM selected | JPEG selected | Blue line selected | ||
|---|---|---|---|---|---|
| black&white | colour | B&W or colour | |||
| LRIT (Meteosat) | JPEG 8 bits (1) | PGM 1 byte | PPM 3 bytes | JPEG 24 bit (2) | select window pops up |
| LRIT (foreign) | PGM 1 or 2 bytes | PGM 1 or 2 bytes | (not supported) | JPEG 24 bit | select window pops up |
| HRIT except HRV | PGM 2 bytes | PGM 1 or 2 bytes | PPM 3 bytes | JPEG 24 bit | select window pops up |
| HRIT HRV | PGM 2 bytes | PGM 1 or 2 bytes | (not supported) | JPEG 24 bit | |
| HDF5 | PGM 2 bytes | PGM 1 or 2 bytes | PPM 3 bytes | JPEG 24 bit | rah (for wsat, hrptreader) |
| AVHRR | PGM 2 bytes | PGM 1 or 2 bytes | PPM 3 bytes | JPEG 24 bit | rah (for wsat, hrptreader) |
| EPS | PGM 2 bytes | PGM 1 or 2 bytes | PPM 3 bytes | JPEG 24 bit | rah (for wsat, hrptreader) |
| Admin | text (ASCII) format | ||||
| Other | binary format | ||||
Notes:
 xrit2pic [options]
  Options:
    -h                                  this help.
    -e                                  non-gui examples
    -nogui                              command line mode
    -src                                path to source XRIT files (def.: see ini-file).
    -dest                               path to destination dir (def.: see ini-file).
    -v                                  Release info
    -gen_ini                            generate a xrit2pic.ini and quit
    -safe_mode                          don't use info of other files

  options for file formats:
    -pgm                                generate PGM  (see below for defaults
    -pgm8                               generate PGM (forced to 8 bits pp)
    -jpg                                generate JPEG (see below for defaults)
    -jpg=<q>                            generate JPEG, q=quality (1...100 (def. 70))
    -cjpg                               generate JPEG (no interm. decompression)
    -rah                                generate rah from AVHRR
    -movie                              generate movie, remove frame pictures
    -movie_kp                           generate movie, keep frame pictures
    -movie_ru                           generate movie, reuse frame pictures
    -add_to_movie                       add frame to movie

  options for rgb mapping:
    -compose                            make false-color pics
    -compose <type>                     same, use pre-defined type:
                                          nrgb, nrgb_dn, airm, dust,
                                          eview, nfog, dfog,
                                          uph_cloud, uph_dust,uph_ash,
                                          uph_night, uph_day,
                                          conv_storm, snow_fog
    -temp                               generate temperature mapping (IR only)
    -temp_bw                            same, GOES mode-A mapping (IR only)
    -hrvlum                             use HRV for lum (high-res colour)
    -inv                                invert
    -inv <chan>                         invert this channel
    -msb 9,8 or 7                       msb for translation 10 bits->8 bits
    -lmin <val>                         minval; this val mapped on 'black'
    -lmax <val>                         maxval; this val mapped on 'white'
    -gamma <val>                        gamma
    -ro <offset>                        offset for red (def. 0)
    -go <offset>                        offset for geen (def. 0)
    -bo <offset>                        offset for blue (def. 0)
    -r "[<chp>,<chn>,<kmin>,<kmax>,<g>]" complex compose on red:
                                          <chp>-<chn>,
                                          T-range 'kmin-kmax' mapped to 0...255
                                          using 'gamma'
    -r <channame>=<val>                 same, with val (-100...100)
    -r <channame>                       use this channel for red
    -g "[<chp>,<chn>,<kmin>,<kmax>,<g>]" complex compose on green, see red
    -g <channame>=<val>                 same, with val (-100...100)
    -g <channame>                       use this channel for green
    -b "[<chp>,<chn>,<kmin>,<kmax>,<g>]" complex compose on blue, see red
    -b <channame>=<val>                 same, with val (-100...100)
    -b <channame>                       use this channel for blue
    -lut                                use def. lut
    -lut {n}                            same, use n'th row
    -lut <lutname>                      use this lut
    -lut <lutname>{n}                   same, use n'th row

  options for geo mapping:
    -nolin                              don't linearize AVHRR
    -europe                             Europe part only (MSG)
    -area <area_nr>                     fixed areas defined in prefs tab Mapping
                                          0=full, 1/2/3/4: see prefs(def.: 1=europe)
    -area <area_name>                   same, use  name instead of number.
    -proj <projection>                  projection: plate_carree, mercator,
                                                    polar_n, polar_s,
                                                    normal (default)

  options for outputs to generate:
    -o <file>                           name output file
                                          see for defaults:
                                            Preferences, tab 'Files', subtab 'Output'
    -pro                                extract also prologue file
    -epi                                extract also epilogue file
    -overwrite                          force overwrite
    -f                                  same
    -skip_incomplete                    don't process incomplete images
    -test                               don't generate, just show what will happen.
    -log                                generate log file 'xrit2pic.log' (in dest. dir)

  options for overlays:
    -overlay_files                      .
    -anagl                              generate anaglyph
    -anagl <shift:lmin-lmax>            same, shift and lum-range
    -anagl <shift:lmin>                 same, shift and lum-start
    -anagl <shift>                      anaglyph, shift in pixels
    -ol                                 use def. overlay
    -ol <type>                          same, this type
    -ol=<lum>                           def., with lum: 0..255 (def. 255)
                                          if hex notation: define rgb, e.g. 0x800
    -ol=<lum> <type>                    same, this type
                                        type=coa(st),cou(ntry),b(oth)
    -lonlat                             add lon/lat lines
    -lonlat=<lum>                       same, with lum; see -ol
    -mark                               add marker
    -mark=<lum>                         same, with lum; see -ol
    -cities                             add cities
    -cities=<lum>                       same, with lum; see -ol
    -timestamp                          add date/time to pic.
    -timestamp@[<x>,<y>]s<size>         same,font size <size>
    -timestamp@[<x>,<y>]                same, at position (x,y)
    -ltimestamp                         see -timestamp, show local time
    -ltimestamp@[<x>,<y>]s<size>        same,font size <size>
    -ltimestamp@[<x>,<y>]               same, at position (x,y)
    -add_text <text>                    add text
    -add_text@[<x>,<y>]s<size> <text>   same,  font size <size>
    -add_text@[<x>,<y>] <text>          same, at position (x,y)

  options for selecting (wild-cards allowed)s:
    -chan <chan>                        translate only this channel
    -segm <segm-range>                  translate only these segments
    -type <H or L or A>                 translate only this type (HRIT/LRIT/AVHRR)
    -sat <sattype>                      translate only this sat (MSG1, MET7...)
    -date <yy-mm-dd>                    translate only this date
    -time <hh:mm>                       translate only this time


Default generated formats: See Generated files.
For options -chan, -date and -time wildcards are allowed.
In the non-gui mode xrit files can be translated immediately into JPEG/PGM files.
Example:
This will translate all HRIT files with channels VIS* (VIS006, VIS008), segments 3 until 7, of februari 2004 and time 21:00, together with their prologue files.
The log file, if generated, will be placed in the destination directory. Note that this file will not be overwritten; new info will always be appended.
Make sure that you have write access to the destination directory! Otherwise nothing will happen, and also no log file will be created (because this file would be created in the destination directory).
See Example nongui commands.
The 2 PC's have the following functionality:
Advantage: Processing is quicker (decompressing Wavelet is processor intensive).
Disadvantage: Bigger files (if used format is PGM) or data loss (if JPEG is used)
Method B is currently the best method: no data loss before processing, and file sizes relatively small.
Now in detail:
If no directories are defined then defaults are used.
Define directory with XRIT files:
Some notes:
xrit2pic saves its settings into a preferences file xrit2pic.ini.
In previous versions of xrit2pic it was possible to save button states, and restore these at restart.
This is replaced by special 'save' buttons on some of the tabs. A save button on a tab will save
the state of buttons on that tab only.
Clicking on 'Save ' in the preferences window will not save changes of buttons.
If no viewer is specified the following built-in viewers are used:
Note: This is another way to determine the source directory; see also Directory setting.
Calculations center/delta's to zoom areas:
There are 2 files to download:
Unzip the 2 files and place the result into e.g. $HOME/bin.
There are 4 or 5 files to download:
Installation using install program:
Installation: (if install program is not used)
Start it using 'Task scheduler'.
Using two PC's.
Xrit2pic may be used in a 2-PC environment, but has currently some limitations.
In this part 3 methods are described, as well as a detailed settings description
for one of the methods.
There are several methods to use 2 PC's:
Method A: (see detailed Windows settings below)
Method B:
Advantage compared to previous method is that the copy mechanism may run on
low priority, so less chance on lost segments. Also, raw data is read just once from harddisk 'R'.
Method C:
(Note: Working on adding losless compressed format with at least 10 bits per pixel.)
Settings for remote access (Linux).
If Linux is running on both PC's you can do a remote mount using sshfs:
(as root, of course).
Now you can browse to /mnt/msg, and from thereon to all directories below (asuming protections are set correctly).
Settings for remote access (Windows).
Method A using Windows.
In short, if your files on your Receiving PC are in:
then you need to make shareable:
and in xrit2pic on the Processing PC you can find the files on the receiver PC in:
(with rec_pc the network name of your receiver PC).
Assumed is standard Tellique installation, i.e., received directory is:
Program Files\T-Systems\BusinessTV-IP\received
on your Receiver PC.
Note: The directory which is made shared ('BusinessTV-IP' in this example)
is NOT reachable by xrit2pic, but directories below the shared directory
('received' in this case) are.
This is the reason why the directory containing received is made shareable, and NOT received itself!
Check that the directory is shared:
\\pcname\BusinessTV-IP (with pcname the name of your Receiver PC).
\\pcname\BusinessTV-IP\received
Note that this is the same directory name found on the 'Receiver PC' under 'My network locations',
but with directory received added.
Now the content of the directory on the remote 'Receiver PC' should be vissible in the main window.
What works remotely:
What maybe doesn't work remotely: (to test)
Directory setting.
Now the program will jump to the main part, and the content of the selected directory is visible.
Click 'OK'.
\\computer_name\c\
(Note: NO ':' after the disk name!)
After typing the last '\' the directory content of the remote computer is examined and made visible, and browsing is possible as usual.
Preferences.
You can get back the program's defaults by clicking the 'Load defaults' button.
Save settings by clicking on Save '.
Note that the directory list (see Directory setting) is also saved, including the directory selected!
If the program is started a next time it will read the preferences file and will immediately load the directory which was selected just before saving the preferences file.
For each viewer options may be defined to make sure that the picture is always shown "upside up".
In the example:
Note: If no '%s' is added the filename will be added as last argument to the program.
If '%s' is present then this will be replaced by the filename. (Compare in this example avi and pgm.)
xv file.jpg
wsat -w 500 -h 500 -i file.pgm
mplayer -fps 3 file.avi -loop 0 &
Note: JPEG files will be always as they are transmitted (i.e., MSG and MET files upside-down, foreign formats upside-up).
 Define directories for:
(The destination directory may also be entered manually in the 'Destination directory' field.)
(The destination directory may also be entered manually in the 'Source directory' field.)
 Define files for:
The default time/date spec "%t" may be replaced by a more custom time spec.
Formatting will be done according to the strftime() C-function, except for the folowing % codes:
Also in this tab: Define location of one mark point
format example result comment
picture picture.jpg always same filename
%s%c_%t MSG1VIS006_061220_1200.jpg
%k, %s, %c, %n, %r, %t
Some codes:
       %a     The abbreviated weekday name according to the current locale.

       %A     The full weekday name according to the current locale.

       %b     The abbreviated month name according to the current locale.

       %B     The full month name according to the current locale.

       %C     The century number (year/100) as a 2-digit integer. (SU)

       %d     The day of the month as a decimal number (range 01 to 31).

       %D     Equivalent to %m/%d/%y. (Yecch - for Americans only.   Americans
              should  note  that in other countries %d/%m/%y is rather common.
              This means that in international context this format is  ambigu-
              ous and should not be used.) (SU)

       %e     Like %d, the day of the month as a decimal number, but a leading
              zero is replaced by a space. (SU)

       %H     The  hour as a decimal number using a 24-hour clock (range 00 to
              23).

       %I     The hour as a decimal number using a 12-hour clock (range 01  to
              12).

       %j     The day of the year as a decimal number (range 001 to 366).

       %p     Either  \x{2018}AM\x{2019}  or  \x{2018}PM\x{2019} according to the given time value, or the
              corresponding strings for the current locale.  Noon  is  treated
              as \x{2018}pm\x{2019} and midnight as \x{2018}am\x{2019}.
Save colour mappings per source type:
Adjust and save colour mapping for up to 4 source types. The colour mapping will be used as default for the related
Set to build-in default colour mappings.
Save zoom areas:
For each are define:
If lon+/-delta is outside the globe then take x=0 or width-1.
If lat+/-delta is outside the globe then take y=0 or height-1.
Saving/restoring gui state.
Note: This mode is replaced by 'Save' buttons on some of the tabs on the main window.
This gives a better control on saving certain button state, instead of saving all button states.
You can switch on the gui state mode in Preferences, tab 'Misc':
(re)store gui state
For following windows the gui state can be saved/restored after start-up:
To save the gui state:
The file is stored in xrit2pic.gini in the current directory. Like xrit2pic.ini it may beplaced in a central location; see
Settings
Appendices.
Installation.
This is a list of all needed/related items for xrit2pic to run:
category name needed update where to get
Main program xrit2pic(.exe) always each new release http://www.alblas.demon.nl/wsat
library GTK always never http://www.alblas.demon.nl/wsat (Windows)
library JPEG always never http://www.alblas.demon.nl/wsat
library Wavelet always never http://www.alblas.demon.nl/wsat
init-file xrit2pic.ini no (defaults) - generated by xrit2pic
gui init-file xrit2pic.gini no (defaults) - generated by xrit2pic
supporting program bzip2(.exe) AVHRR only never http://www.alblas.demon.nl/wsat (Windows)
overlay files met8*.gif etc. Geostat. Meteosat never Eumetsat
Kepler files noaa.txt AVHRR lon/lat calc. each month? http://www.celestrak.com
Linux.
Installation of xrit2pic is simple; it is just a matter of placing
the program and its libraries on the right place.
It is assumed that gtk is installed. This is normally always the case (I think)
on Linux machines. Otherwise download and install gtk-1.2.
For AVHRR bzip2 is needed. This is also present in each Linux distribution.
Windows.
Installation of xrit2pic is simple; it is just a matter of placing
the program and its libraries on the right place.
For updates it is normally enough to download just xrit2pic.zip, and then run
the installer.
Note In Properties of the link (select from menu via right mouse-click)
it is possible to minimize the command shell which pop ups at start of xrit2pic.
Also the working directory may be changed here.
Example non-gui commands.
Next command translates all HRIT files with a channel name starting with VIS for every day with UTC time of 12:00. Only segments 7 and 8 are added to the picture (which is Europe).
xrit2pic -nogui -type H -chan VIS* -segm 7-8 -time 12:00
Next is a example to do this translation 'forever'; each day the receive directory is cleaned.
xrit2pic -nogui -type H -chan VIS* -segm 7-8 -time 12:00 -log
rm /home/user/from_msg/received/*
Start it as a cronjob every day around midnight (at least several minutes from the time that the files to translate are generated!)
xrit2pic -nogui -type H -chan VIS* -segm 7-8 -time 12:00 -log
del c:\from_msg\received\*.*
Temperature mapping.
For both pgm and jpeg output files:
In command line mode, using option -temp_bw, mapping is done using GOES mode-A (dog-leg) scaling for temperature:
In gui mode the same happens after selecting one IR channel, and clicking "Export".
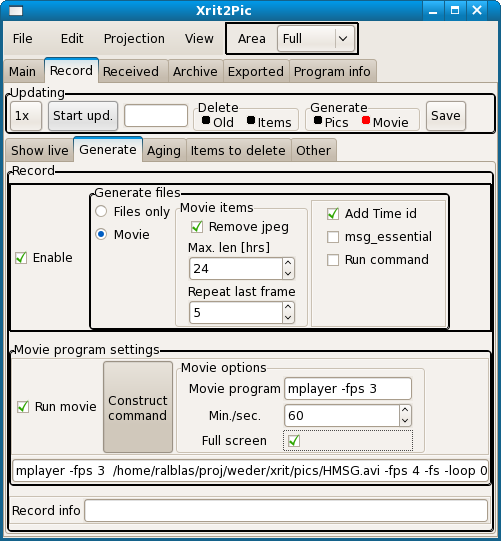
Details about movie generation.
xrit2pic generates movies in the following way:
If an external encoder 'mencoder' is used then basically the same happens.
'mencoder' combines ALL files in the temp directory into a movie file; this is the reason why first
all files are moved to the sav directory. For the internal movie generator this isn't necessary.
Advantage of mencoder is that several codecs may be used. The default one is msmpeg4v2.
The options of mencoder, or even the whole command, may be replaced by something else; see preferences and mencoder manual. So other codecs or a complete different encoder program may be used.
Details about anaglyph generation.
Meteosat data doesn't contain 3d info. For getting a 3D illusion the left and right pictures are generated using
the luminance of each pixel. Clouds are bright and high, land is relatively dark and low, which clarifies why
luminance can be used for depth information.
Each pixel is duplicated in red and cyan; the shift between the two is bigger if the luminance is low ('land').
Adjusting.
In the preview window several buttons pop up in Anaglyph mode.
If land/coastlines have to be added:
Suggestion: Sea and cloudless low-land.
Suggestion: Clouds should just get some green spots.
Anaglyphs are possible for black-and-white and coloured picures, as well as movies.
Black-and-white gives better results than colour anaglyphs.
Continuous movie generation.
Example of generating a continuous movie of the last 2 days, wihout filling up your disk.
Using rgb day/night colours.
The 'Save' instructions are only needed to get the same settings after restarting xrit2pic.
Next is currently for Linux only. Extra settings to run mplayer, showing continuously the movie.